Standard Green LED Exit Light Combo | 180° Adjustable Head
Base Code: COMBO2-G


Compatible Battery: Battery Backup Model: BAA-36
Remote Head Capable Model: BAA-3618
Compatible Remote Head(s): RHP-L-3V, RHB-L-3V, RHB-WPL-3V
To use with with remote heads, please change the Operation Type above to Battery Backup + Remote Head Capable to ensure compatibility. Code at time of checkout must read: COMBO2-G-W-RH.

UL Listed
This item has been tested and meets safety standards imposed by the Underwriters Laboratories (UL).

LED Lighting
This product uses energy efficient and long lasting LED's.

Battery Included
This product contains a battery for backup power. The battery must be connected during installation.
Features
- UL 924, NEC, OSHA and NFPA 101 Life Safety Code
- Listed for damp location
- All LED light! No SLA batteries, uses long lasting NiCads that are very low maintenance (battery included)
- Two fully adjustable Emergency Light heads designed to point down and light the path of egress
- Injection molded, 5VA flame retardant thermoplastic housing
- 120/277 VAC operation
- Universal mounting plate
- Knock-out left/right arrows
- Short circuit, voltage surge, brown out and low battery voltage disconnect protected
- LED indicator light with push-to-test switch
Specifications
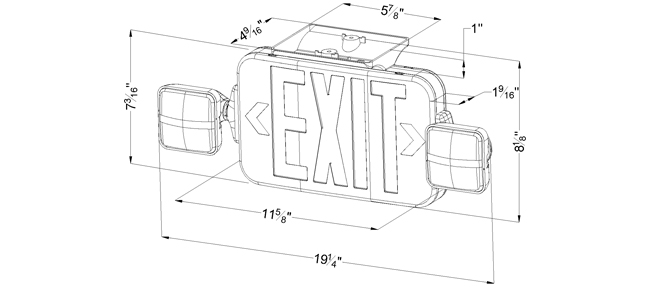
| Dimensions (May Vary by Model) | |
| Width | 20" |
| Height | 8" |
| Depth | 2" |
| Weight | 8.00 lb |
What's included?
- Green LED Combo Exit Sign / Emergency Light
- Two "EXIT" Faceplates (with optional knockout arrows)
- One Blank Faceplate
- Mounting Canopy, Installation Instructions & Hardware (Inside Unit)
- NiCad Battery - Must connect the battery after installation
Construction
The COMBO2-G series is contructed from injection-molded, high-impact, engineering-grade, 5VA flame retardant thermoplastic. White housing is standard..
Illumination
Emergency lamps use long-lasting, energy efficient ultra bright white LEDs. Heads are made with high-performance chromeplated reflectors and polycarbonate lenses for optimal light distribution. Exit portion uses red or green LEDs.
Emergency Operation
Upon failure of the normal utility power, an internal solidstate transfer switch automatically provides uninterrupted emergency operation for at least 90 minutes. The fully automatic solid-state, two-rate charger initiates recharging a discharged battery within 24 hours.
Battery - Battery Backup
The COMBO2-G Combo Exit Light is designed with a maintenance-free 3.6V 100mAh NiCad battery that provides a minimum emergency duration of 90 minutes. Recharge time of the battery is 24 hours.
Operational Temperature
| Temperature Ratings | |
| Standard Option | 32°F to 104°F |
Photometrics
Total Luminaire Lumens : 275lm
Suggested mounting height of 7.5ft multiple units illuminate 1 footcandle (FC) spaced at 18ft for a 3ft path of egress.
Disclosure:
Spacing is measured in lab condition with an assumed open space, no obstruction and reflection rates of 80 (ceiling) / 50 (walls) / 20 (floor). Actual spacing may vary depending on what environment the fixture is installed in.

Self-Testing Option
Unit continuously monitors the AC power, battery supply voltage, emergency lamp condition and charging circuit. If failure is detected, the indicator will show status and correct when adjusted. Unit will automatically perform testing for five minutes every 28 days and 90 minutes every six months.
Remote Head Capable Option
The remote head capability option allows the COMBO2 unit to supply power to up to two additional 3.6V LED remote heads. The remote heads would then operate on the same emergency mode as the standard units (see Emergency Operation Section).
Electrical Components
120/277 VAC operation. LED display indicates AC/ON. An external push button test switch allows maintenance personnel to quickly determine the operational status of the unit. Unit offers surge protected, solid state circuitry.
Installation
The COMBO2-G is suitable for surface wall and top mounting via included canopy. Snap together design allows for quick and easy installation. Knock-out chevrons for customized egress signage.
![]() Mounting Configurations Explained
Mounting Configurations Explained
![]() View Installation Instructions
View Installation Instructions
Dimensions

View Common Questions or Ask Your Own Below


